Website Links

Friday, 26 September 2014

The Recursion Checklist

Recursion isn't the hardest principle to understand, but often is not a way of thinking that comes most naturally for developers. Personally, I have struggled with recursion and try as I might to avoid it, sometimes it is the cleanest way! After using it a few times I have become more comfortable with it, and have developed a checklist of what to look for when writing a recursive function.

The Base Case

  • Prevents infinite recursion
  • Kind of similar to a while loop condition for when to stop looping

The Recursive Call

  • Moves towards the base case
  • The defined method is called from within itself

Famous Recursion

Words are great, but rarely help you understand a problem... So now let's take a look at a few common examples:
  • Fibonnaci
  • Trees

Fibonacci

Fibonacci is simply written using recursion but also is incredibly inefficient this way. Nonetheless, consider the following:

  public int fibonacci(int n)  {
     if(n == 0) {
        return 0;
     } else if(n == 1) {
        return 1;
     } else {
        return fibonacci(n - 1) + fibonacci(n - 2);
     }
  }

Fibonacci is a classic algorithm that makes 2 recursive function calls and is exponentially large. Recursion is terminated when n is either 0 or 1. However, although it is most simply written recursively it can be much more efficiently written iteratively, as follows:

  public int fibbonaci(int n) {
     int current = 0; 
     int next = 1; 

     for (int i = 0; i < n; i++) {
        int temp = current + next;
        current = next;
        next = temp;
     }

     return current;
  }


Finding the root of a tree node

Let's assume we are given the following class to represent a node of a tree, and that the values in the tree are populated appropriately:

  public class Node {
     private Node _parent;
     private IList _children;

     public Node getRoot() {
        if (_parent == null) {
           return this;
        }

        return _parent.getRoot()
     }

     public Node getParent() {
        return _parent;
     }
  }

The getRoot method is recursive as it calls itself, and will keep calling itself until it gets to the root node. The root node is where recursion terminates due to the check if the parent is null. As the root node is the value returned in the base case, this value propagates all the way up through the recursive calls to the entry point of the method, and thus this is a simple way to get the root of the tree. Alternatively, this same method can be written without recursion and this may be preferable for the reasons described later:

  public Node getRoot() {
     Node currentNode = this;
     
     while(currentNode.getParent() != null) {
        currentNode = currentNode.getParent();
     }

     return currentNode;
  }


Iteration or Recursion?

When deciding whether to use recursion there are a few things you should consider:
  1. How much data are you working with?
  2. Is there a simple iterative solution?

How much data are you working with?

This is a very important factor, as if you have too much data and thus very deep recursion, a stack overflow will occur and your program will throw an exception. This is when your program tries to use more space that is available on the call stack. The size of the call stack varies depending on a variety of factors such as machine architecture and programming language.

Some languages, such as Scheme, are optimised to allow for infinite tail recursion, and implement tail call optimisation. Unfortunately, in most languages such as C#, Python and Java, this is not the case. Tail recursion is when the return result comes entirely from the recursive call. For example, our getRoot call is tail recursive as the return result relies entirely on the recursively called function or the base condition. Whereas, the following function is not tail recursion as it relies on the multiplication of the parameter n times the value of the recursive call, and thus the recursive call must be evaluated before the return value can be.

  public int fact(int n) {
     if (n == 0) {
        return 1;
     } else {
        return n * fact(n - 1);
     }
  }


Is there a simple iterative solution?

Often recursion is the simplest way to solve a problem, and this is when it is most commonly used. It is important when choosing whether to use a recursive or iterative approach, to decide whether you can simply implement a solution using an iterative approach. In general, an iterative approach is more efficient as there is less overhead involved.

References

http://stackoverflow.com/questions/3021/what-is-recursion-and-when-should-i-use-it

Thursday, 18 September 2014

C# vs Java - Access Modifiers

C#

There are 5 access modifiers in C#:
  • public
  • private
  • protected
  • internal
  • protected internal
These are used in the declaration of classes, structs and members of classes or structs. The public access modifier allows access from anywhere, and should be used sparingly. It is best to use public only where a member will need to be accessed by a class that is not part of the same assembly or extends the applicable class. The public modifier is common in the declaration of classes or properties, as classes are often externally used and properties define getters and setters and thus aid encapsulation.

The private modifier is good for encapsulation, as it hides anything that should be inaccessible by another class. It is the most restrictive of access modifiers as only code in the same struct or class can access it, and is the default for class or struct members. The private modifier is commonly used on fields, but is also used on methods that may be called within public methods but shouldn't be accessible otherwise. By using the private modifier where possible we can help reduce the chance of other programmers calling the wrong method when they are using our class. It is important to note a class cannot be private unless it is nested within another class.

The protected modifier means that the type or member can only be accessed by code in the same class, or classes that inherit from it. Therefore, it is important to give careful thought to members you are considering declaring protected as if you release your code as a library, and other classes extend your class, and then you want to make a change to the member, your change may break code that uses your library. The protected modifier can be useful when declaring an abstract class, to ensure that classes which extend this abstract class have access to members which should be common amongst all classes that extend the abstract class.

The internal modifier is the default for classes and structs in C#, and is similar to package-visibility in Java. This modifier gives access to any code in the same project, and is commonly used to confine the use of a class to a project in a solution. Generally, a class' members have lower or equal accessibility to the class, but sometimes when an internal class extends a public class it may have public members that it has overridden from the base class.

Additionally, there is the protected internal access modifier. This basically means it can be accessed from code where it could be accessed from if the member was declared protected OR internal. Finally, it is important to note that interface members cannot be declared with an access modifier, this makes sense as the purpose of an interface is to allow another class to access another's members. Interfaces can either be internal or public.

Java

Java is quite similar to C#, so first we will outline the similarities in access modifiers:
  • public behaves the same way in both C# and Java
  • private behaves the same way in both C# and Java.
  • protected behaves the same way in both C# and Java.
However, there are some differences. Firstly, by default classes or members of a class have package-visibility in Java which means that they can be accessed by code in the same package. Whereas, in C# default accessibility for a member is private and the default accessibility for a class in internal. Package-visibility is similar to internal visibility, except that in Java the package is represented physically by a directory and only code in the same directory can access something with package visibility. Whereas, with internal members any code in a project (not necessarily the same directory) can access it.

Finally, in Java there is no way to explicitly set package-visibility, and no way to allow for either protected or package-visibility access for the same member (as you do with protected internal in C#). Therefore, you have a lower level of control over the accessibility of classes and their members than you do in C#. C# is easier to modularize your code in, by using internal and having different projects in the same solution, and therefore I find it better suited for commercial work as it is easier to maintain the structure of a solution.

Tuesday, 9 September 2014

Overview of Layouts for WPF

Layout Containers

Layout containers are what you put your content in. There are 5 main types and each have situations where they are advantageous.

Stack Panel

This is one of the most simple layouts to use, but does not give you much control over how elements are laid out. It allows you to layout items horizontally or vertically by setting the 'Orientation' attribute of the StackPanel. By default, orientation is Vertical. Its children are laid out in the order in which they are specified in the xaml and sizing is handled automatically. Here's an example:

   <StackPanel Orientation="Horizontal">            
      <TextBlock>Name</TextBlock>
      <TextBox Width="200" />
   </StackPanel>


Wrap Panel

The WrapPanel is very similar to the StackPanel, it will lay its children out either vertically or horizontally but when it runs out of space to do so it will continue to lay out its children on the next column or row respectively. It is also a simple layout to use and is advantageous when you want your layout to adjust to resizing and you aren't concerned about the positioning of your elements relative to the frame of the WPF application. Here's an example:

   <WrapPanel Orientation="Horizontal">            
      <Button>Buttons will wrap!</TextBlock>
      <Button>Buttons will wrap!</TextBlock>
      <Button>Buttons will wrap!</TextBlock>
      <Button>Buttons will wrap!</TextBlock>
      <Button>Buttons will wrap!</TextBlock>
      <Button>Buttons will wrap!</TextBlock>
      <Button>Buttons will wrap!</TextBlock>
      <Button>Buttons will wrap!</TextBlock>
      <Button>Buttons will wrap!</TextBlock>
   </WrapPanel>


Grid

This is the layout that is most frequently used throughout our Spelling Bee app, and is quite powerful while still being simple to use. When using a Grid layout you are able to specify the rows and columns, and you are also able to specify the height or width of these. We have found that we most commonly set these to either '*' or 'Auto'. Auto means that the row or column will size itself such that it fits its child, whereas * means that the remaining space will be consumed. If there are multiple rows or columns set to *, then the remaining space will be divided evenly amongst them. The * may also be prefixed by a number which will result in the corresponding column having a width: ([remaining space]/[n + other column * total]) * n, where n is the number prefixing the *. The same applies for rows, here is an example:

   <Grid>
      <Grid.RowDefinitions>
         <RowDefinition Height="Auto" />
         <RowDefinition Height="*" />
         <RowDefinition Height="3*" />
      </Grid.RowDefinitions>
      <Grid.ColumnDefinitions>
         <ColumnDefinition Width="Auto" />
         <ColumnDefinition Width="*" />
      </Grid.ColumnDefinitions>

      <TextBlock Grid.ColumnSpan="2">My Form!</TextBlock>
      <TextBlock Grid.Row="1" Grid.Column="0">Name</TextBlock>
      <TextBox Grid.Row="1" Grid.Column="1" 
         HorizontalAlignment="Stretch" />

      <TextBlock Grid.Row="2" Grid.Column="0">Comment</TextBlock>
      <TextBox Grid.Row="2" Grid.Column="1"
         HorizontalAlignment="Stretch" 
         VerticalAlignment="Stretch" 
         TextWrapping="Wrap" />
   </Grid>

In the above example, the 3rd row will take up 3/4 of the remaining space. Additionally, we specified which row and column elements would be in using Grid.Row and Grid.Column! Finally, another feature of a grid is that we can set a column or row span using Grid.ColumnSpan or Grid.RowSpan respectively. Grids are useful in many situations, but are particularly useful for laying out forms. It is important to note that you can programmatically define new rows and columns which may be useful for laying out data, but there are other elements which may make this easier.

Dock Panel

The DockPanel is one of the layouts we use less frequently, due to our unfamiliarity with it. However, it can be useful, specifically when you want some elements relative to the edges and then an element to take up the remaining central space. For example, many websites such as Facebook have a top bar, this would be set in a DockPanel by listing the top bar element first and setting the attribute DockPanel.Dock on it to "Top". Websites such as Facebook often also have a left sidebar for navigation, in a DockPanel this would be done by setting the attribute DockPanel.Dock to "Left". We could continue this for the ad view, chat bar and news feed, but it is simpler to show you the xaml for it:

   <DockPanel LastChildFill="True">
      <StackPanel Name="topBar" DockPanel.Dock="Top">
         ...
      <StackPanel>

      <StackPanel Name="navSideBar" DockPanel.Dock="Left">
         ...
      <StackPanel> 

      <StackPanel Name="chatBar" DockPanel.Dock="Right">
         ...
      <StackPanel> 

      <StackPanel Name="adBar" DockPanel.Dock="Right">
         ...
      <StackPanel> 

      <StackPanel Name="newsFeed" DockPanel.Dock="Top">
         ...
      <StackPanel> 
   </DockPanel>

The LastChildFill attribute of the DockPanel means that the last child will take up the remaining central space. The above xaml shows a simplified example of how Facebook is laid out, it is important to note that the ordering of child elements is important in a DockPanel whereas it isn't in a Grid.

Canvas

Last but not least, we have the Canvas! When using a Canvas you position children elements using explicit coordinates. The coordinates are specified relative to the sides of the canvas, for example, x coordinates are specified relative to the left and right sides and y coordinates are specified relative to the bottom and top sides. A canvas is typically used for grouping 2D graphic elements together, and it is not considered good practice to use it to layout UI elements. The following is an example:

   <Canvas>
      <Rectangle Canvas.Left="30" Canvas.Top="70" 
         Width="100" Height="100" Canvas.ZIndex="1" />
      <Rectangle Canvas.Right="270" Canvas.Bottom="130"
         Width="200" Height="100" />
   </Canvas>

Another cool feature of the Canvas is that by setting the Canvas.ZIndex you can set the Z-Ordering. By default they are ordered from back to front in the order they are specified in the XAML and this is the way we would do it rather than setting the Canvas.ZIndex but it could be useful for updating the Z-Ordering programmatically.

Wednesday, 3 September 2014

Using Text To Speech For Windows Phone 8.1

Text to speech in Windows Phone Silverlight apps is remarkably simple. However, as with everything the more you want to do the more complex it gets. Having said that this tutorial should be able to guide you through most things you may commonly want to do. First, we created a button in our xaml that when clicked called the following method with a word of our choosing:


  private async void Play_Word(string word)
  {
      var synth = new SpeechSynthesizer();
      await synth.SpeakTextAsync(word);
  }


The async keyword basically says that the method will run asynchronously, so as to not block the caller's thread. It is used because speaking text may be a long running task. It ensures that the user doesn't experience a lack of responsiveness. Whereas the await keyword means that the rest of the method will not be executed until the call following the await has completed. We actually instantiated our SpeechSynthesizer in the constructor, but we have moved the instantiation into Play_Word for completeness, and will now just refer to the SpeechSynthesizer as _synth.

In our app we used text to speech to say a word for the user to spell. However, upon using it several times we realised the rate of speech was too high as words such as 'ant' and 'bee' were spoken too quickly to be distinguishable. Therefore, we switched to using SSML to speak the text at our desired rate. Our amended method was as follows:


  private async void Play_Word(string word)
  {
      string ssml = String.Format("<speak version=\"1.0\" 
        xmlns=\"http://www.w3.org/2001/10/synthesis\"
        xml:lang=\"en-US\">
        <prosody rate=\"-2\">{0}</prosody>
        </speak>", word);
      await _synth.SpeakSsmlAsync(ssml);
  }


Basically, the speak tag must surround the SSML tags that specify how your words will be spoken, and its attribute xmlns defines the XML namespace. Prosody controls the rate, pitch and output volume. As we only wanted to control the rate we set the rate attribute of prosody. There are also other aspects of speech you can control, and W3's SSML page documents them.

Custom Templates for ListBoxItems in WPF

Sometimes you may want a ListBox which has custom row templates, for example when you want to display an object in a ListBoxItem. Firstly, we wanted to ensure our ListBoxItem took up all the horizontal space available to them so that we could mock a grid. This is what ListBox.ItemContainerStyle and its inner xaml does. Secondly, we wanted to have 2 TextBlocks in our ListBoxItem, to do this we defined an ItemTemplate for our ListBoxItem which can be seen below in our ListBox.ItemTemplate xaml.


  <ListBox Name="guessListBox">
    <ListBox.ItemContainerStyle>
      <Style TargetType="ListBoxItem">
        <Setter Property="HorizontalContentAlignment" 
                Value="Stretch" />
      </Style>
    </ListBox.ItemContainerStyle>
    <ListBox.ItemTemplate>
      <DataTemplate>
        <Grid>
          <Grid.ColumnDefinitions>
            <ColumnDefinition Width="*" />
            <ColumnDefinition Width="*" />
          </Grid.ColumnDefinitions>
          <TextBlock Text="{Binding SuppliedGuess}" />
          <TextBlock Grid.Column="1" 
                     DataContext="{Binding Word}"
                     Text="{Binding Name}" />
        </Grid>
      </DataTemplate>
    </ListBox.ItemTemplate>
  </ListBox>


We gave the ListBox a name so that we could easily set the ItemsSource of it, using guessListBox.ItemsSource = Guesses; Guesses is an ObservableCollection of Guess objects with the properties: string SuppliedGuess, Word Word, and several others which are not important for the purpose of our example. The Word object has the property string Name, and several others which are also not important for this tutorial.

You may notice that the first TextBlock has its Text attribute bound to SuppliedGuess, this means that the Text attribute automatically comes from a Guess's SuppliedGuess property as a collection of Guesses are supplied as the ListBox's ItemsSource.

However, for the second TextBlock it has a DataContext set. This is because the Text attribute automatically comes from the Name property of the Word which is a property of the ListBoxItem's Guess.

Tuesday, 2 September 2014

Local Database with Windows Phone 8.1

Following on from the previous post, we now want to incorporate basic local database into our application which words and scores will be stored in. To begin we looked at the local database sample.

Model/ToDoDataContext.cs

First, we'll take a look at the ToDoDataContext class in the Model folder! This is where you define how your data will be stored. To start off, we added a new folder and C# class to our spelling bee project and called them Model and SpellingDataContext respectively. Then we had SpellingDataContext extend DataContext, if you need to add a reference to System.Data.Linq.dll in your project you may have selected a universal app initially. This means you may need to use SQLite or switch to a Windows Phone Silverlight app, if you chose a Windows Phone Silverlight app initially your references will appear as follows:


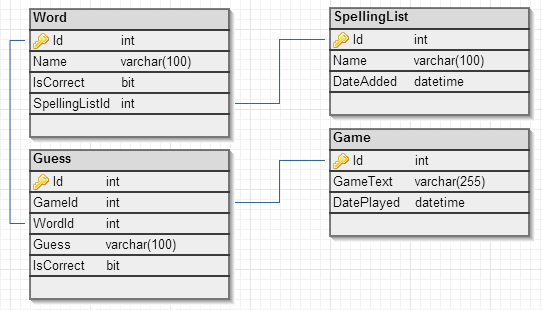
Now we're ready to define how our data will be stored, to start off design your schema. We decided on the following, using dbdsgnr:


Now that we know what we want, let's take another look at ToDoDataContext.cs. As you can see, we have a constructor that passes the connection string to the DataContext super class. We want to replicate this for SpellingDataContext:


Now we are going to define our tables, we can do this in the same way as ToDoDataContext. The [Table] statement basically specifies that the following code pertains to a table. The use of square brackets before a block of code denotes an attribute in C#. You can also see these before the public properties which have the attribute defining a column before them. The column attribute for ToDoItemId has parameters, the parameters which can be passed in and their meaning are defined on the Microsoft page on attribute-based mapping. That page also has information on the parameters which can be present when defining an association. An association in the case of our Spelling Bee app would be a foreign key constraint e.g. the one that associates a word with a spelling list.

Once all your tables, columns and associations are defined you must add a reference to the tables from your DataContext object, e.g. public Table<Word> Words; After this we can move onto defining our ViewModel. An example of defining a table is as follows:


    [Table]
    public class Word {
        private int _id;

        [Column(IsPrimaryKey = true, IsDbGenerated = true, 
         DbType = "INT NOT NULL Identity", CanBeNull = false,
         AutoSync = AutoSync.OnInsert)]
        public int Id
        {
            get { return _id; }
            set
            {
                if (_id != value)
                {
                    _id = value;
                }
            }
        }

        private string _name;

        [Column]
        public string Name
        {
            get { return _name; }
            set
            {
                if (_name != value)
                {
                    _name = value;
                }
            }
        }

        private bool _isCorrect;

        [Column]
        public bool IsCorrect
        {
            get { return _isCorrect; }
            set
            {
                if (_isCorrect != value)
                {
                    _isCorrect = value;
                }
            }
        }

        [Column]
        internal int _spellingListId;

        private EntityRef _spellingList;
        [Association(Storage = "_spellingList", 
         ThisKey = "_spellingListId", OtherKey = "Id", 
         IsForeignKey = true)]
        public SpellingList SpellingList
        {
            get { return _spellingList.Entity; }
            set
            {
                _spellingList.Entity = value;

                if (value != null)
                {
                    _spellingListId = value.Id;
                }
            }
        }
    }


ViewModel/ToDoViewModel.cs

Now for the ToDoViewModel, this is where we handle events relating to data and what we use to get data! First we created a ViewModel folder and a SpellingBeeViewModel C# file. Then we took a look at the ToDoViewModel, this has a private field toDoDB of the ToDoDataContext type which unsurprisingly provides a reference to the database we just specified. The toDoDB is initialised in the constructor. We did the same for our spelling database in our SpellingViewModel class, to arrive at something like this:


Next, we looked at the data available through the ToDoViewModel. It defined a private field and property for all the data required by the MainPage and NewPage, so we did the same for our SpellingViewModel. We decided we needed the following data:
  • A collection of games. This can be added to when a new game is started, and is used for displaying scores.
  • A collection of spelling lists. This can be added to from the menu bar and is used for selecting which spelling list you would like to try.
  • A collection of words you have currently spelled correctly. This will be displayed on the home page.
  • A collection of words you have currently spelling incorrectly. This will be displayed on the home page.
Therefore, we created corresponding private and public fields in our SpellingViewModel of type ObservationalCollection. ObservationalCollections were used to aid us in automatically updating the user interface. For example, if we bind a dropdown to a observational collection and it changes, the dropdown will automatically update to match the changes.


The above populates the properties we defined earlier. But what if we want our database to come pre-populated with defaults and where do we load the database from? The answer is from your App's C# code, for us it is App.xaml.cs.

App.xaml.cs

In the App constructor, we want to instantiate the SpellingDataContext and check if the database exists. If the database doesn't exist we want to create it and insert the initial values in it:


Once the data has been loaded, we want to create the view model which will be used throughout the app for populating views. Using the view model, we can then call our method which retrieves the data from the database and maps it to collections on the view model. Now you can store data easily on Windows Phone apps, and use it in whatever way you like. It's important to note you may encounter a few issues:
  • If you cannot create your database your attributes on your columns may be a potential cause, in particular we had issues with auto-generating values for an entry based on an expression.
  • Also as mentioned previously, if you have to add references for linq then you may have selected a universal app initially. In which case either SQLite will need to be used or you can manually switch to a Windows Phone Silverlight app. The decision between the two will depend on how much code you have written when you discover this problem.
Enjoy!