Friday, 27 January 2017
React Native #7 - React vs React Native
When developing using React Native, we reference two separate libraries (both React and React Native).
Thursday, 26 January 2017
ESLint
ESLint is a tool that analyses your JavaScript for potential errors and can be installed into many common text editors. This can help you pick up errors in your JavaScript without reloading your website or react native app, which can help you increase your productivity... YAY!
ESLint has a few setup layers - this is split into editor specific config and project specific config. This means we can configure which ESLint rules to validate our code using on a project by project basis. There are some preset configurations for this so that as a developer you don't need to add rules one by one.
ESLint has a few setup layers - this is split into editor specific config and project specific config. This means we can configure which ESLint rules to validate our code using on a project by project basis. There are some preset configurations for this so that as a developer you don't need to add rules one by one.
Setting up ESLint in Sublime
- Install eslint globally using npm:
npm install -g eslint
- Install Package Control
- Do per project setup:
- Install a set of rules that you want eslint to use to validate your code (there are other ones out there but here's an example)!
npm install --save-dev eslint-config-rallycoding
- Create a file in your project's root directory called .eslintrc
- Tell eslint which rules to use by adding the following to the file:
  {
    "extends": "rallycoding"
  }
Noting that it is important that these are double quoted.
- Install a set of rules that you want eslint to use to validate your code (there are other ones out there but here's an example)!
- Use Package Control to install linter and eslint to Sublime Text
- Open up the command palette (Tools > Command Palette or command + shift + P)
- Search for install and click on install package
- Once this has loaded, search and click on SublimeLinter
- Repeat for the package SublimeLinter-contrib-eslint
- Exit out of Sublime Text, and reopen
- Delete a semi-colon and save to confirm eslint is setup correctly. If this doesn't show errors, then move your cursor around a bit.
Tuesday, 24 January 2017
React Native #6 - Navigator
In React Native, to add navigation to your app you can use the Navigator component. You can have as many navigators as you want in your app e.g. you may have one for your whole app or multiple if you are using tabs with different navigation stacks for each tab. This tutorial will explain how to add a single navigator to your react native app. Firstly, add the navigator as the base for your application so specify it in the index.ios.js and the index.android.js:
The next step is to be able to add and remove from the navigation stack. For simplicity, I will demonstrate this using back and forward buttons:
  // Import the Navigator from React Native
  import React, { Component } from 'react';
  import {
    AppRegistry,
    Navigator
  } from 'react-native';

  import MainScene from './app/scenes/mainScene'
  import AddGoalScene from './app/scenes/addGoalScene'

  export default class Goalie extends Component {
    renderScene(route, navigator) {
      // Specify the properties to pass to the scene you will
      // render. It is useful to pass the navigator around the
      // scenes so that you can push and pop to the navigation
      // stack.
      var globalNavigatorProps = {
        navigator: navigator,
        goal: route.goal
      };

      // Based on the route passed to the navigator you can
      // determine which scene to render.
      switch(route.ident) {
        case "MainScene":
          return ( <MainScene {...globalNavigatorProps} />);
        case "AddGoalScene":
          return ( <AddGoalScene {...globalNavigatorProps} />);
        default:
          return ( <MainScene {...globalNavigatorProps}  />);
      }

    }

    render() {
      return (
        // Render your navigator
        // You must specify an initial route, which will become
        // your root view for the app. The initialRoute is just
        // an object with an identifier you can use to define
        // which screen should be displayed, and whatever other
        // info you would like to pass in.
        // You must also specify a renderScene function which
        // has the args route and navigator, this must return
        // what you would like to render on the navigation stack.
        <Navigator
          initialRoute={{ident: "MainScene", goal: "MainScene" }}
          renderScene={this.renderScene} />
      );
    }
  }

  AppRegistry.registerComponent('Goalie', () => Goalie);
The next step is to be able to add and remove from the navigation stack. For simplicity, I will demonstrate this using back and forward buttons:
  import React, { Component } from 'react';
  import {
    Button
  } from 'react-native';

  import ViewContainer from
    '../components/viewContainer/ViewContainer'

  export default class MainScene extends Component {

    // Passes new route to the navigator, the scene
    // with the corresponding identifier will get rendered.
    navigateToAddGoal() {
      this.props.navigator.push({
        ident: "AddGoalScene",
        goal: this.props.goal
      });
    }

    // Removes the current scene from the navigator's
    // stack, and goes back to the previous scene.
    goBack() {
      this.props.navigator.pop();
    }

    render() {
      return (
        <ViewContainer>
          <Button title= "Back"
            onPress = { (event) => this.goBack() }/>
          <Button title= "Forward"
            onPress = { (event) => this.navigateToAddGoal() }/>
        </ViewContainer>
      );
    }
  }
C# - Lambda Expressions
Lambda expressions are anonymous methods that have:
We use them for convenience so that we can write less code to achieve the same result. We also use them to make our code more readable. You can define a lambda expression as follows:
- No access modifier
- No name
- No return statement
We use them for convenience so that we can write less code to achieve the same result. We also use them to make our code more readable. You can define a lambda expression as follows:
    // The generic types defined within the < and > represent the input
    // and output values, the first x types being the inputs
    // and the last type being the output
    Func increment = number => number++;

    // You can call a lambda expression like this:
    int incrementedNumber = increment(1);

    // A lambda expression with no arguments is defined like this:
    Func greeting = () => "Hello world!";

    // A lambda expression with multiple arguments is defined like this:
    Func add = (x, y) => x + y;

    // A lambda expression can also access variables in scope:
    var name = "Chelsea";
    Func greetPerson = () => "Hello " + name;

    // This would print out "Hello Chelsea":
    Console.WriteLine(greetPerson());

    // This would print out "Hello Tessa":
    name = "Tessa";
    Console.WriteLine(greetPerson());
References
C# Lambda Expressions on YouTube https://youtu.be/SLPJ2GqF2Ts?t=5m14sMonday, 16 January 2017
React Native #5 - Installing/Uninstalling Modules using npm
One awesome thing about React Native is that you can use the npm to install packages which allow you to reuse JavaScript code that someone else has written(see here for list of packages)! This post will take you through how to install/uninstall packages.
Installing Packages
First, you will need to find a package you would like to install on the npm website. Once you find a package, go to your react native project's folder in the terminal and type:npm install react-native-checkbox-field --save--save means that the module you are installing will be automatically added to your package.json's dependencies. If you don't want your package.json to update, leave off the --save. After completing the install and updating your package.json, you can then use your new package as described on the packages page on the npm website, e.g:
import { CheckboxField, Checkbox} from 'react-native-checkbox-field';
Uninstalling Packages
Uninstalling packages is similar to installing packages. Go to your react native project's folder in the terminal and type:npm uninstall react-native-checkbox-field --save--save means that the module you are uninstalling will be automatically removed from your package.json's dependencies. If you don't want your package.json to update, leave off the --save. After completing the uninstall and updating your package.json, you will no longer have access to the package you have uninstalled so you should remove all references to it.
Friday, 13 January 2017
React Native #4 - Props
Props allow you to make a component with that is reused throughout your app with slightly different properties. This can be referred to from your custom component's render function:
Note: {this.props.message} is surrounded by braces to embed it into JSX.
You could then utilise your reusable component by importing and adding the following to another component:
  import React, { Component } from 'react';
  import { Text } from 'react-native';

  class MessageView extends Component {
    render() {
      return (
        {this.props.message}
      );
    }
  }
Note: {this.props.message} is surrounded by braces to embed it into JSX.
You could then utilise your reusable component by importing and adding the following to another component:
<MessageView message="Hello World! />
Thursday, 12 January 2017
React Native #3 - Flexbox Basics
Laying out components in React Native is done using flexbox, the key difference though is that style names are written camelcase e.g. background-color would be backgroundColor when defining it as part of a React Native Stylesheet. Today, I'll take you through the key ways you can layout your components using flexbox:
Parent Properties
display: flex;
In web dev, if you want to layout your page using flexbox you will need to specify "display: flex;" in your style for that HTML element. However, in react native this is unnecessary.flexDirection
- row (default): layout child components left to right
- row-reverse: layout child components right to left
- column: layout child components top to bottom
- column-reverse: layout child components bottom to top
flexWrap
- nowrap (default): components try to fit on one line
- wrap: components can wrap onto new line (left to right)
- wrap-reverse: components can wrap onto new line (right to left)
flexFlow
Shorthand for flexDirection and flexWrap e.g. column wrapjustifyContent
Distributes space left over once all the child items have been rendered.- flex-start: components are rendered at the start of the parent
- flex-end: components are rendered at the end of the parent
- center: components are rendered at the center of the parent
- space-between: components are rendered equidistant apart, with a component aligned with both the start and end of the parent component
- space-around: components are rendered equidistant apart, with a space at before the first and last component
alignItems
How components are aligned vertically for row layout or horizontally for column layout:- flex-start: aligned with the top of the parent layout for row, and with the left of the parent for column
- flex-end: aligned with the bottom of the parent layout for row, and with the right of the parent for column
- center: centered within the parent element
- stretch: components stretch to fill the parent element (respects min/max width/height)
- baseline: components are aligned along their baselines
alignContent
Similar to justifyContent but vertically for row and horizontally for column. It has the same potential values as justifyContent.Child Properties
order
Takes an integer value, and defines the order components appear in the container. By default, this is based off the components order in the HTML.flexGrow
A unitless number that dictates what amount of space an item should take up in a flex container as a proportion.flexShrink
Similar to flexGrow except it specifies the items ability to shrink if necessary.flex
Combination of flexGrow, flexShrink and flexBasis (in that order e.g. 0 1 auto). flexShrink and flexBasis are optional.alignSelf
Allows the alignment specified by alignItems to be overridden for the specific child item. It shares the same potential values as alignContent.References
Comprehensive Flexbox TutorialWednesday, 11 January 2017
React Native #2 - Creating Components
In this post, I will take you through how to create a component that is reusable in iOS/Android. First off, we will make a folder where we place all our reusable code, I have called it app and created it under the folder that was created when using the react-native command to initialise your app. There will be a few different things that go in this folder, so I have created another folder under app called components.
The first file imports React and Component, React is a default export (see here for explanation) and so doesn't need to be in {}. We import Component so that we can define a new component and how it is rendered, this is defined in the render function. We also import View from react native, as this is the type of existing component we want to base our custom component off. And finally, we also import the style for the view container which is called style.js:
The second file imports StyleSheet from react native, which can be used to define the style of the view component using flexbox CSS.
ViewContainer Component
I have chosen a simple component for the purpose of this tutorial, and it is a ViewContainer component. It is effectively a react native view, with specified styling applied and will form the base of all the screens you add to your app. Under app/components I add a new folder called viewContainer with 2 new files, the first file defines how the component is rendered and is called viewContainer.js:
  'use strict';

  import React, { Component } from 'react';
  import { View } from 'react-native';
  import styles from './style';

  class ViewContainer extends Component {
      render() {
          return (
              <View style={styles.viewContainer}>
                  {this.props.children}
              </View>
          );
      }
  }

  module.exports = ViewContainer;
The first file imports React and Component, React is a default export (see here for explanation) and so doesn't need to be in {}. We import Component so that we can define a new component and how it is rendered, this is defined in the render function. We also import View from react native, as this is the type of existing component we want to base our custom component off. And finally, we also import the style for the view container which is called style.js:
  'use strict';
  import { StyleSheet } from 'react-native';

  const styles = StyleSheet.create({
      viewContainer: {
          flex: 1,
          flexDirection: "column",
          justifyContent: "center",
          alignItems: "stretch"
      }
  });

  module.exports = styles;
The second file imports StyleSheet from react native, which can be used to define the style of the view component using flexbox CSS.
Using the ViewContainer Component
Your ViewContainer component can be used by either Android or iOS, so in either your index.ios.js or index.android.js or both, you can change the file to be:
  import React, { Component } from 'react';
  import {
    AppRegistry,
    StyleSheet,
    Text
  } from 'react-native';

  import ViewContainer from
    './app/components/viewContainer/ViewContainer';

  export default class Goalie extends Component {
    render() {
      return (
        <ViewContainer>
          <Text style={styles.welcome}>
            Welcome to React Native!
          </Text>
          <Text style={styles.instructions}>
            To get started, edit index.ios.js
          </Text>
          <Text style={styles.instructions}>
            Press Cmd+R to reload,{'\n'}
            Cmd+D or shake for dev menu
          </Text>
        </ViewContainer>
      );
    }
  }

  const styles = StyleSheet.create({
    welcome: {
      fontSize: 20,
      textAlign: 'center',
      margin: 10
    },
    instructions: {
      textAlign: 'center',
      color: '#333333',
      marginBottom: 5
    },
  });

  AppRegistry.registerComponent('Goalie', () => Goalie);
Monday, 9 January 2017
React Native #1 - Getting Started!
Hi everyone, React Native is a cool framework I've been learning about lately that lets you build mobile apps using Javascript. So over the next few weeks I will document my efforts with developing apps in React Native!
Getting Started
Just follow the React Native Getting Started guide to download everything you require. Note: iOS apps can only be developed on a Mac. I will be developing an app for both Android and iOS over this series so will be using a Mac. If you get errors, you may need to update node/npm if you have previously installed these.Initialising the App
- In your terminal, change to your development directory or where you want your react native project to be saved.
- Enter the command
react-native init [project_name]
This will setup your React Native project - Enter the command
cd [project_name]
- Enter the command
react-native run-ios
from inside your React Native project directory to see the base iOS output - To see the base Android output:
- Open the android folder in Android studio
- Go to Tools > Android > AVD Manager and setup a device, this will handle installing anything you need for the emulator to run
- Run the virtual device you created
- Enter the command
react-native run-android
from inside your React Native project directory to see the base Android output
Editing the view
You can edit the view displayed in the index.android.js and index.ios.js files in your preferred text editor.Swift - Adding a Leaderboard to an App with GameKit
GameKit makes it really easy to add global scoreboards to an app, where you can compare yourself to Game Center friends or everyone who has played on the all time scoreboard. This article will take you through how to add it to your apps.
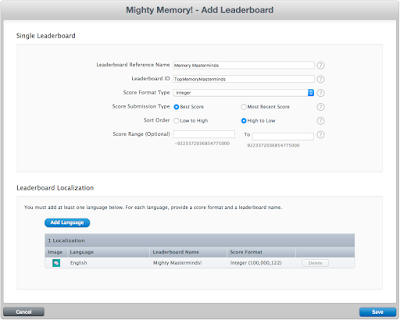
Then click on the plus next to leaderboards and select "Single Leaderboard". You should now be at a page that looks like this:

Fill out the fields, the Leaderboard Id will be how you reference it in the code. Ensure you also add a language, the name here will be the name that appears to users viewing your scoreboard:
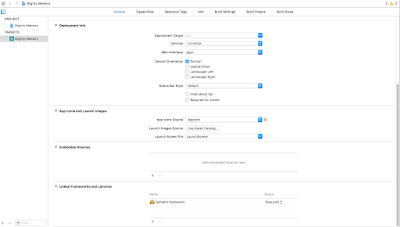
Once you are done click save, and ensure that Game Center is enabled for your app against the build you are setting up. Then you will need to also enable it via Xcode. Open Xcode and ensure that GameKit is added as a Linked Framework/Library:
Finally, check the capabilities to ensure Game Center is successfully enabled:

Next, you will want a view with a button to show the leaderboard , the view controller for this view should implement GKGameCenterControllerDelegate and handle dismissal and opening of the leaderboard. In this example saving of the score happens here as this view is displayed upon game completion. However, saving of the score can happen anywhere in your application.
Initial Setup
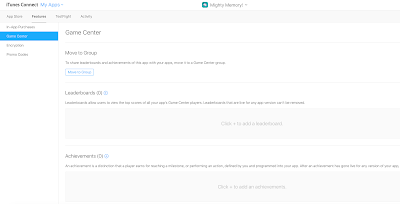
First, go to iTunes Connect and select your app, and then click features. It should look something like this:
Then click on the plus next to leaderboards and select "Single Leaderboard". You should now be at a page that looks like this:

Fill out the fields, the Leaderboard Id will be how you reference it in the code. Ensure you also add a language, the name here will be the name that appears to users viewing your scoreboard:

Once you are done click save, and ensure that Game Center is enabled for your app against the build you are setting up. Then you will need to also enable it via Xcode. Open Xcode and ensure that GameKit is added as a Linked Framework/Library:

Finally, check the capabilities to ensure Game Center is successfully enabled:

Coding a Leaderboard
First, ensure the user is logged in when they first open the application by authenticating the player in the viewDidLoad function on one of the initial ViewController's presented by the application. Ensure the state of whether game center is enabled or not is saved, as this will allow you whether to show the option to view leaderboard after a user has played your game. For convenience and code simplicity, gameCenterEnabled is a global variable in this example.
  import UIKit
  import GameKit

  class ViewController: UIViewController {

    override func viewDidLoad() {
        super.viewDidLoad()
        score = 1
        // Do any additional setup after loading the view,
        // typically from a nib.
        authenticateLocalPlayer()
    }

    override func didReceiveMemoryWarning() {
        super.didReceiveMemoryWarning()
    }

    func authenticateLocalPlayer() {
        let localPlayer = GKLocalPlayer.localPlayer()

        localPlayer.authenticateHandler = {(ViewController, error)
          -> Void in
            if((ViewController) != nil) {
                // 1 Show login if player is not logged in
                self.present(ViewController!, animated: true,
                             completion: nil)
            } else if (localPlayer.isAuthenticated) {
                // 2 Player is already authenticated & logged in
                gameCenterEnabled = true
            } else {
                // 3 Game center is not enabled on the users device
                gameCenterEnabled = false
            }

        }
    }
  }
Next, you will want a view with a button to show the leaderboard , the view controller for this view should implement GKGameCenterControllerDelegate and handle dismissal and opening of the leaderboard. In this example saving of the score happens here as this view is displayed upon game completion. However, saving of the score can happen anywhere in your application.
  import UIKit
  import GameKit

  class ResultViewController: UIViewController,
                              GKGameCenterControllerDelegate {
    @available(iOS 6.0, *)
    public func gameCenterViewControllerDidFinish(_
      gameCenterViewController: GKGameCenterViewController) {
        gameCenterViewController.dismiss(animated: false,
                                         completion: nil)
    }

    override func viewDidLoad() {
        super.viewDidLoad()
        saveScore()
    }

    override func didReceiveMemoryWarning() {
        super.didReceiveMemoryWarning()
    }

    // save score to leaderboard with matching id
    func saveScore() {
        if (gameCenterEnabled) {
            let leaderboardID = "com.tripwire.memorymasterminds"
            let scoreToRecord = GKScore(leaderboardIdentifier:
                                        leaderboardID)
            scoreToRecord.value = Int64(score)

            GKScore.report([scoreToRecord],
                           withCompletionHandler: nil)
        }
    }

    // display leaderboard with matching id
    @IBAction func showLeaderboardClicked(sender: AnyObject) {
        let gcVC = GKGameCenterViewController()
        gcVC.gameCenterDelegate = self
        gcVC.viewState = GKGameCenterViewControllerState
                             .leaderboards
        gcVC.leaderboardIdentifier =
          "com.tripwire.memorymasterminds"
        self.present(gcVC, animated: false, completion: nil)
    }

  }
Subscribe to:
Posts (Atom)